I know it has been FOREVER since I last posted on my blog. I’m sorry—I have been to buys living my life to blog about it. But I am SO EXCITED about the most recent project that I just finished that I had to run up to my computer and write a post about it.
To start off—let me just explain that my family just got our family pictures taken for the first time. Now—when I say the first time—I really mean that this is the first time that we haven’t gone to SEARS portrait studio with our coupon and been forced to sit in a tiny little room with our whole family and try and smile and act like we were having a grand old time—while really we were all hating it and the pictures showed how much we were hating it. We were then forced to choose one pose according to our coupon—and we had to choose from 2 or 3 pictures—all of which we really disliked to begin with—so that we could get our blessed pictures!
So—as I was saying—this is the first time that our family had our pictures taken by a professional—out in the real world with the gorgeous fall landscape as our beautiful background. We were so at ease—we actually had a great time at the photo shoot—and it shows!! Our pictures turned out amazing!!! And we had SO MANY to choose from!! It was truly a wonderful experience!
So now that our pictures were taken and turned out beautifully—I had a GIANT BARE NAKED wall in our home (our stair wall) that I wanted to turn into our gallery wall.
I really love the look of a ton of pictures on a wall—but knew that framing all of those pictures could be VERY costly. So I didn’t really know what I was going to do.
BUT THEN my awesome sister Michelle, sent me a link to THIS tutorial of how to make your own photo canvases!!! It is PURE GENIUS I tell you!! And the answer to my picture wall dilemma.
So I RAN to the hardware store and got one 8 foot sheet of 1” Styrofoam insulation and then ran to the fabric store and got 2 yards of black fabric.
And this is what I did:
First I got out some paper and cut out a random assortment of sizes and shapes—and I started taping them up on my wall until I was happy with the layout.

Then I went to my computer and chose which pictures would go where and cropped them to size and ordered them on Costco.com. (The sizes ranged from a 16x20 to 5x7s)
Next I traced out the shapes of all of my pictures on the Styrofoam and labeled them (I really did this with a ruler and didn’t actually trace my pictures—so as not to bend them)

Next I TRIED to cut them out myself using a razor blade (which is the way the gal said she cut some of hers with)—but that ended in DISASTERLY rough and gnarly edges that looked HORRIBLE. So I stopped after one attempt and then had my sweet hubby cut the rest of them with his table saw. He did an AMAZING job at getting them PERFECTLY straight!

Next I cut a piece of fabric slightly larger than each square.

And then I wrapped them up like a present and stapled all the ends down with a regular stapler. There is no need to be fancy or to wrap the whole back of it—because no one is going to see the back side.

I would recommend getting a little more fabric than you think you will need. I didn’t and I came CRAZILY close to not having enough to finish this project. Anyhoo—I made sure to use a lot of staples to make it secure—and I was SUPER ANAL and CAREFUL to fold the corners just right as to have them crease perfectly and not look POOCHY.

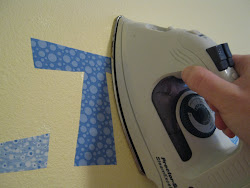
I found that PRESSING the corners down with steam really helped them to lie flat and almost disappear.

Next I finished off the back with Duct Tape to secure the whole thing.

Then I took all the canvases out the my garage and sprayed the fabric fronts of the canvases with this spray glue that I already had on hand.

Then I carefully placed the pictures on each one and gently rubbed them with a soft towel until they had adhered.
Next for the hanging.
The gal in her tutorial hung her canvases with velcro—and I almost did too—until I pulled off the backing to the velcro and felt how sticky that stuff is. I figured if I ever wanted to change things up—I didn’t want to have to patch holes in my wall from tearing off chunks of my wall where that crazy sticky velcro was. And so we found these little picture hooky things in our stash that were perfect. I placed a little hot glue on the back to make sure that they stayed on securely.

Next I laid out all my pictures again on the floor…

And then tried to get them in as close to the same spots on the wall as I could. I have to say that it is pretty hard to hang stuff when you are standing on stairs. I was able to hang all but 2 of them. Then I brought in the big guns to hang the ones I couldn’t reach. We make a good team that way. (He’s standing on a stool here and still having a hard time reaching. It really was difficult! Apparently we need to get one of those ladders that does stairs!)

Then we stood back and admired our handy work.


I am SO IN LOVE with how this project turned out. I have already had a ton of comments and ooohs and aaaahs on this project. And everyone is SHOCKED when I tell them that I made these guys and at how much I spent.

And how much did I spend?
The foam insulation from Lowes: $8.98
2 Yards of Black Fabric from Joann’s: $5.50 with coupon.
Grand Total: $14.48
And I probably spent around $40 for the pictures to be printed at Costco. I had a ton of other pictures printed and Christmas cards done all at the same time—so I’m not super sure and I am too lazy at this particular moment to figure it out. All I know is that it seemed like a good deal for all that I got.
And just today I went to Walmart and bought a frame for another picture we had enlarged—and I bought a CHEAP PLASTIC FRAME and it was over $15!! Just for this one LOW QUALITY frame!!

So this just goes to show how great and thrifty this project really is. AND in a couple years time—when we get our pictures taken again—I can just peel off the pictures and glue on new ones—or refabric them for a few bucks!
I will definitely be using this idea again.