Friday, November 12, 2010

It's a Love/Hate Thing


We live in the North West.  We love it here--most of the time.  We also LOVE the lot our house sits on--most of the time. 

In our front yard we have a large and beautiful tree that in the spring and summer blesses our yard with wonderful BEAUTY and SHADE.

 (I don't have the time to hunt for a great summer picture right now)--But this is the tree: 

And this is what the tree blesses us with in the FALL
(and it hasn't really even started to drop its leaves yet!):


This is what my across the street neighbor's yard looks like:

Nary a leave in sight!

And my next door neighbor: 
Only one or two.

We have a FEW MORE than that.

We also BACK to a BEAUTIFUL green belt. It is GORGEOUS and PRIVATE and WONDERFUL and we LOVE it--most of the time.  
During the spring and summer it is a private, lush and luxurious place to be.

But in the FALL and WINTER--not so much.
This is what we our yard looks like right now.  And My hubby just finished cleaning it to perfection just the other day.  What a difference a week can make!

And I know--I should have cleaned up all the scattered toys around the yard--but I'm just keeping it real people!


Because of our yard--we HAVE to take down our trampoline every year--otherwise it looks like this (and this picture is just after about a week of it being cleaned off--and at the beginning of the leaves falling!):


And because of all the shade--things tend to grow on places they shouldn't...Like this:


But who can REALLY complain when you have THIS for a back yard?


And this:


And my neighbors are missing out on this:


It really is a LOVE/HATE relationship. 

But mostly LOVE...I think.


Tuesday, November 9, 2010

The Reason for my BRASSINESS

Since I posted about my AWESOME NEW KITCHEN BACK SPLASH--I have had a few comments about changing up the brass knobs on my cabinets.  My mom AND my sister even called me to ask me why I haven't done something about them yet.

So apparently I need to set the record strait.

SEVERAL MONTHS AGO I had the same brilliant idea.  I wanted to change those darn brass knobs.  But I was nervous about going full boar ahead on 20+  knobs!  So I decided to do a small scale test run on my BATHROOM knobs--which are identical but there are only 6 of them! 

Same orangey cabinets (as my kitchen):


Same Brassy Knobs:


So I decided to give them a new look with the same spray paint that I used on my door hinge project.


I gave them a good sanding to ruff up the surface so the paint would adhere better.


Then I gave them a few light coats.


Then I installed them.


THEN I HATED THEM!


I just think they are really GREY looking and that truly the brass ones looked better.

What do YOU think?


Now don't get me wrong.  I still DON'T love the brass.  And I am still not content with just leaving them.  I think I need to hunt for a lighter brushed nickel color--and then give it another try.

But for now--THIS IS THE REASON THEY ARE STILL BRASS.

Monday, November 8, 2010

SAMM--Corn Chowder

Today for my SAMM link up--I am doing one of our LONG TIME FAMILY FAVORITES--Corn Chowder.  This chowder has been in our family for generations!  And has been our traditional Christmas Eve dinner for as long as I can remember.  It is one of those SUPER AWESOME HOME COOKED MEALS that just remind you about everything that is good and homey. 

 It is really easy to make--but for some reason I don't make it often enough.  I think it is because it was always made at special occasions growing up--that I don't think of it as an everyday meal.  But it is SOOO good that it should be!  And you HAVE to serve it with some warm--just out of the oven--dinner rolls.  DIVINE!

So with no further ado--Here it is:

Corn Chowder
6-8 Slices of Bacon
1 can corn
1can cream corn
1 small onion chopped
1/4 flour
2 c chicken broth
1 c water
2 c potatoes cubed
2 c celery
1 dash tobasco sauce
2 c milk
Fry bacon and crumble into pieces.  Also fry the onions, celery.  Then add the flour and toss with bacon, celery and onions.  Put milk in a big pot and add everything else (besides the bacon mixture).  Bring to a boil gradually.  Stir in bacon mixture and cook until the potatoes are done.  Serve with rolls.

Doesn't it look dreamy?

And because I am SO IN LOVE WITH MY NEW BACKSPASH--I just couldn't resist this next picture:

And yes I am cheating and using Rhodes rolls tonight.  I know--it is neither thrifty nor domestic.  But it is easy--and sometimes that wins over all.

Friday, November 5, 2010

Tile Looking Backsplash--On a Budget

I am SO EXCITED about how this project turned out!!! 
And because I am SO EXCITED--I took about a Bazillion pictures --so be prepared!

Ok--let me start at the beginning.  I stumbled upon THIS awesome blog (Sawdust and Embryos) a while ago--and have been CRUSHING on all of the AMAZING PAINTED BACKSPASH'S that this gal and her man do up!  And since she lives too far away to do mine--I decided I would just have to do it myself.

And then I remembered that my AWESOME FRIEND Jaime (from I'm a Mom not a Professional)--did the same thing HERE in her house several years ago.  So I called her up and asked her to help me with my kitchen.  And she said YES!!  Isn't she the best?

So here we go:

Here are a few pictures of my kitchen in all its BEFORE glory.  For 8 years I have lived with the Orangey cabinets and grey/blue counters (and I'm not even going to mention the retched white and blue flowered vinyl flooring!) and wondered WHY someone would choose this color scheme?


So to do this project I started gathering my needed supplies.
I stocked up on a bunch of sponge brushes and fine brushes for the detail work. (I spent about $5 on sponge brushes--I found I needed quite a few of them for mixing colors and such).


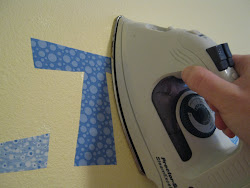
I couldn't find any 1/4 inch Painters tape (for the grout lines) anywhere--so I went to Joann's and got 1/4 inch quilters tape.  (The Big roll--which I used ALL of--was $5.99)


The quilters tape worked great--the only downside for me was that it was EXACTLY the same color as my existing wall--so it was harder to apply and to see what I was doing!  It was Camouflage!
Then for the paint.  I decided on five colors to mix and match to create my tile looking back splash.  I tried to get a color that was close to the cabinets and one that was close to the counter top--and then some others that I thought contrasted nicely with those.  AND A LITTLE FYI--I spent probably around $10-13 on the paint (two bottles of each color).

These are what I decided on:


Then Jaime and I started choosing our color combinations for our tiles.  We used several colors on each tile to add dimension.
These are the combinations we came up with:


Next came the WORST part.  Figuring out the lines and doing the taping.
I unfortunately did this part all by my little lonesome.  And consequently it took me FOREVER (and a lot of pencil marks were erased and redrawn and a lot of tape was wasted) and by the end my brain was tied in a knot.  But  I DID IT!!!!

See how the tape lines are invisible?  Accept for the ones that I started to paint over--but then decided against it. 


And then came the fun part.  PAINTING. 

Jaime made me promise not to put any pictures of her in this post--I don't think this counts do you?


She did take a few of me though.


And I took a few of what 7 kids did while we were painting:


Anyhoo--Back to the painting. 
It doesn't look like much while you are doing it.  You have to keep telling yourself it will look awesome when the tape comes off.


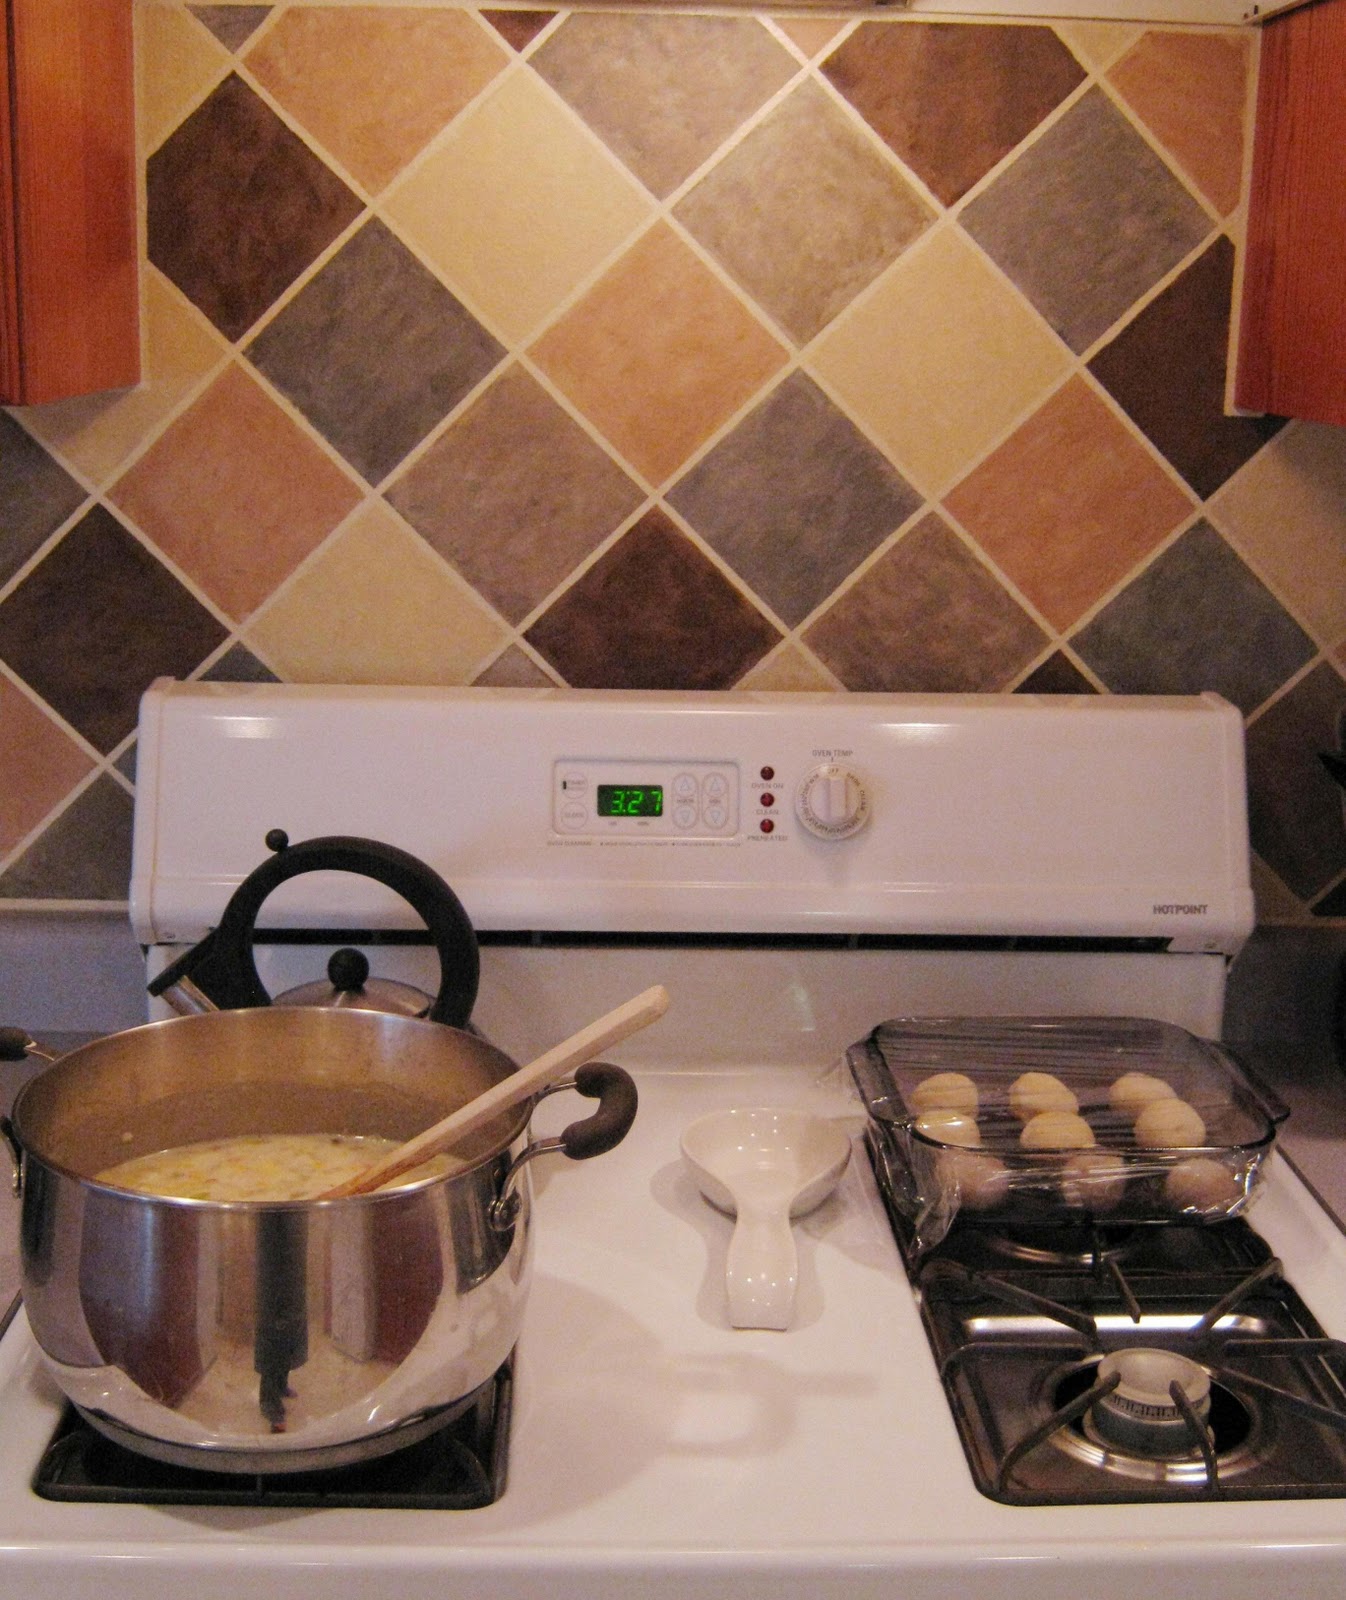
See--it looks SO MUCH BETTER with the tape off.  Now I just need to do some touch up painting in the grout lines.


Making my way all around the kitchen.  ALMOST DONE!!!


It was funny to live with my stove in the middle of the kitchen for a couple days while I finished this project. 


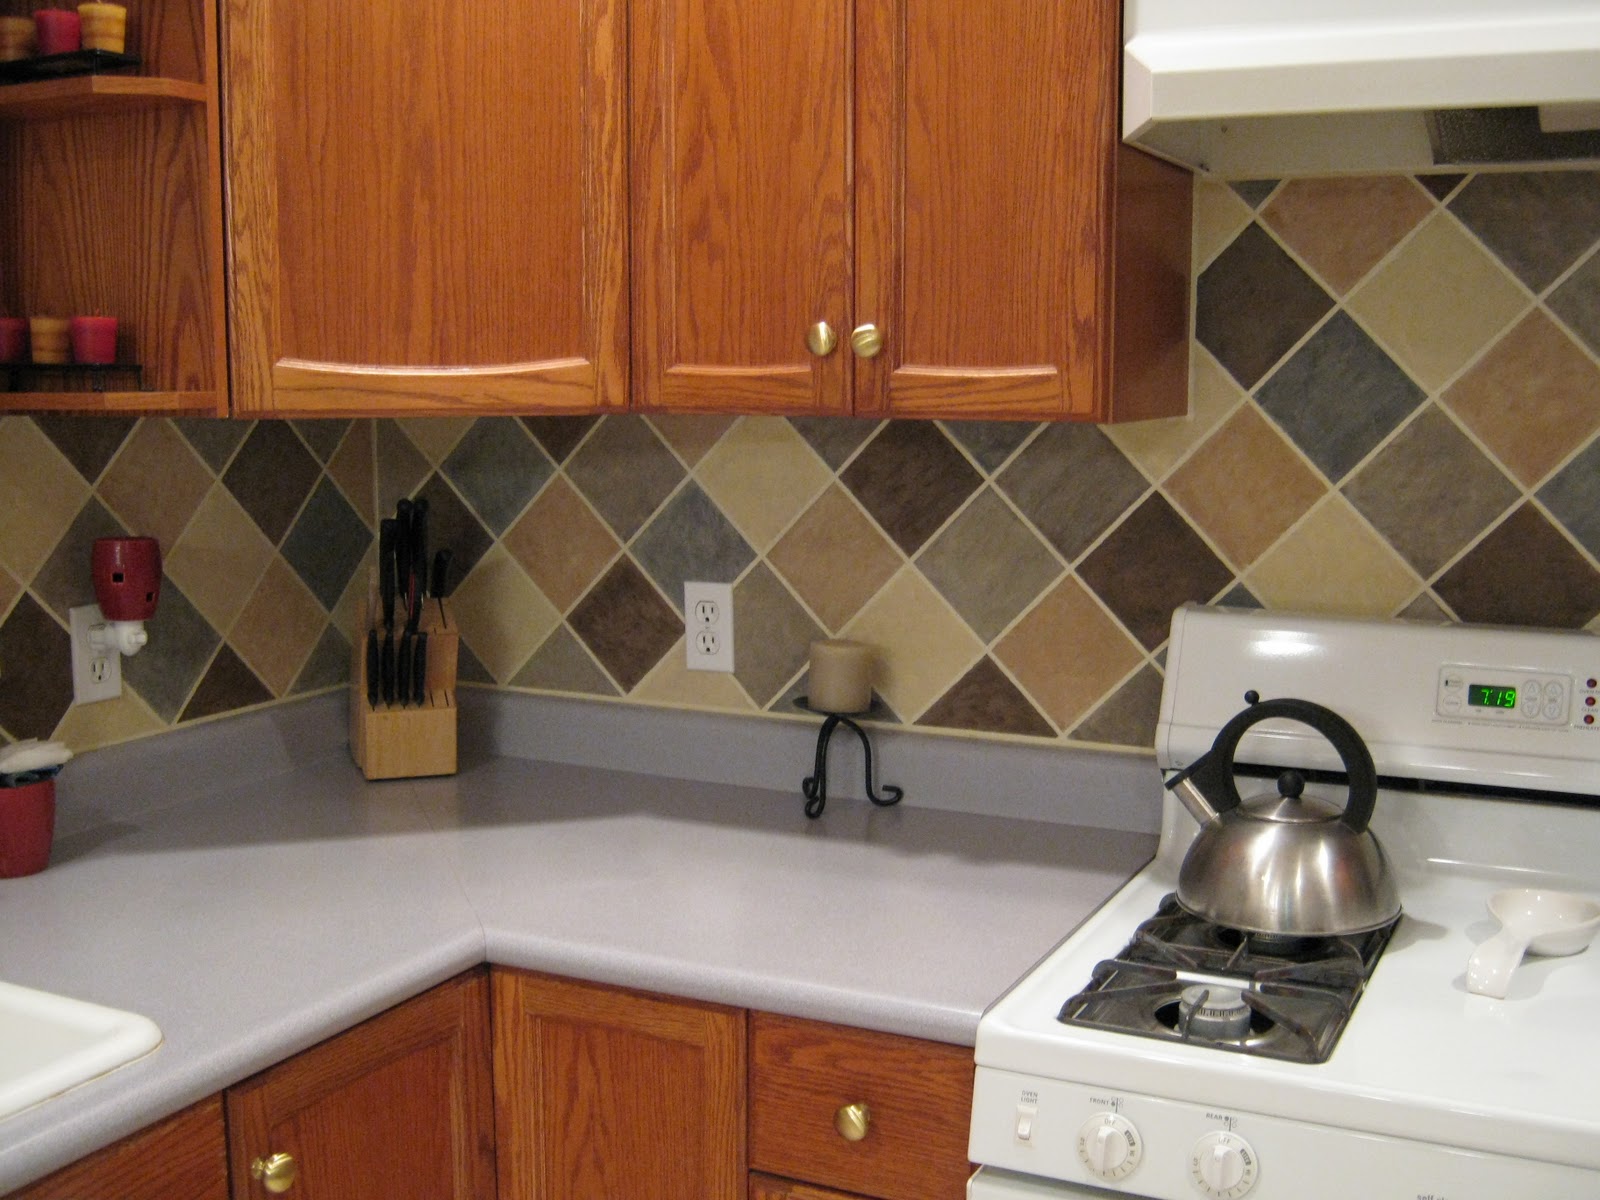
And FINALLY--all the hard work (HOURS of measuring and taping--and pulling it all off to measure and tape all over again, TWO COATS of paint on every square, TOUCH UP PAINT over EVERY GROUT LINE, and then some miscellaneous REPAINTING OF SOME OF THE SQUARES that I wanted a different color--do you know how hard it is to do "RANDOM" evenly?) has finally paid off. 

IT IS DONE!!!
AND it only cost me around $25!!
And I couldn't be happier!  FINALLY the cabinets don't scream ORANGE.  I know longer hate the counters.  They all just go together in one cohesive color scheme.  (Minus the white and blue flower linoleum--but we still aren't talking about that right now).  (Oh--And Minus the Black and White curtains that I will now have to change.)


And just because I am a sucker for BEFORE & AFTER shots.

BEFORE:

AFTER: 

Now life makes sense. 
At least in my kitchen.


Linking to THESE parties.
Related Posts with Thumbnails