Friday, April 30, 2010

Mirror Cutting--EASY SCHMEASY

So--I have been looking for something AWESOME to hang above my new headboard.


I found an awesome mirror at The Good Will for only $5.99.
(I will show it to you later--I'm not quite ready for the reveal yet)


Well after getting it home--I found that my awesome mirror was scratched

(I couldn't tell this in the store because it was so filthy!)

But--I decided I really liked the frame--and decided to see if I could just find a new piece of mirror.


Which I did at our local Re-Store.


I bought a new piece for $2.50. But it needed to be cut down to size.


So I watched some YouTube tutorials on mirror cutting.


Then went down to HOME DEPOT and bought this handy tool for $3.75.

Then I went to work.


Here is how you do it. And it really is EASY SCHMEASY!


To do this you will need:

a mirror at least 1 inch larger than your needed size

(DO NOT TRY AND TRIM OFF LESS THAN ONE INCH!!!)

Towel
gloves

Mirror cutting tool

oil (like for sewing machines or hair trimmers)

Sharpie Marker

doweling

Straight edge

Something grippy (this is to hold down your straight edge so you can make a clean cut)


Here is the start of my work surface. And sorry again--blogger will not let me turn my picture the right way!!! Frustration!! (Turn your head and you'll get the idea)

First put a towel under your mirror to catch any little shards and to protect the mirror and your awesome blue carpet (if you are lucky enough to have any!)

Then measure with your ruler where you want your new lines to be and mark them with a sharpie marker.

I placed my little grippies under my ruler on top of my mirror so there was no way it would move while I was scoring the mirror.


Next you want to place a drop of oil on the little scoring part of the tool.

Then you start at the top of the mirror and make sure you are scoring right on your line. THIS IS EXTREMELY IMPORTANT!! The tool has about an eighth inch edge to it--so you will need to place your ruler out 1/8th inch so you will score right on your line.

Then you press firmly on the tool as you drag it all the way down your line--applying even pressure. Make only one pass.

Then you will place the doweling under the scored part. Then with gloved hands--press firmly down on the part you want to break off. And it breaks perfectly on the scored line! Like So:


And that is how it is done.

Super Easy!!


I am SO EXCITED to add this little skill to my arsenal! It is not hard at all and will work on glass too! With this skill the possibilities are endless!


You really have to give it a try sometime!

Thursday, April 29, 2010

Pine Wood Derby Treats

This year I got put in charge of refreshments at my son's Pine Wood Derby.
I had no original ideas myself--but I think I did a great job copying THIS great idea for fun pine wood derby treats!
(Hey--I did change it up a little by using different flavored zingers instead of just twinkies!)
(And again--blogger will not let me orient my picture the way I want!!! So turn your head to see how cute they turned out!)
Little Derby Cars for Little Derby Treats!

Wednesday, April 28, 2010

Lamp Redo AGAIN

Remember my other posts about my little lamp redo's?
Remember this ugly thing?
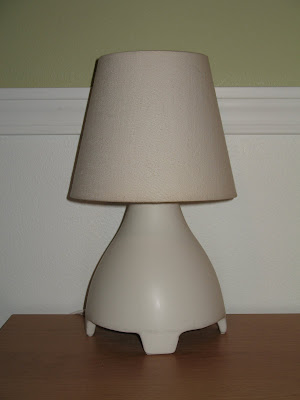
Remember how I turned it into this?
Remember How I still hated that lamp even after it was finished?
I hated how it looked so stubby compared to the other one.
Well, I told you that I extended its life for a little longer. And I was right--approximately 2 weeks longer. Until I found this little beauty at the Good Will.
So here it is with MY shade on it.
I may decide to paint it sometime to match mine better--but for now I am happy!
My Shade looked so good--I decide he could keep it--and I took his old shade and put it on my lamp.


Now I am SO HAPPY!!

I think it looks so much more balanced and even though they are not exactly the same lamp--they look like a cute little pair of his and her lamps.

AAAHHH!!! Much better!

Now I just have to finish the project that will deal with that big space above my headboard!

Hopefully I will post that soon!

(Oh--and did you notice my coasters from THIS project? I really do Love them!)

Monday, April 26, 2010

Crazy for Coasters

So--I had never had any coasters in my house before, and had never really given them much thought.


Then I saw this little tutorial at Make it and Love it--using up her scrap fabric.


Well--I had lots of scrap fabric--and come to think of it--I often have wet little rings on my tables after setting a glass down! So therefore I decided I NEEDED to make some coasters!!


So here they are using the left over fabric from THIS project:


I had them in a little stack on my counter--and they looked cute--until I found this little basket for $0.25 at my friends Dollar Thrift Store!
I of course forgot to take a picture of it BEFORE I spray painted it this awesome shade of Black!
My cute little coasters fit so perfectly in there! I love it!

And I think it makes this little corner of my kitchen fabulous AND functional!


But I couldn't stop there!

Because NOW I WAS IN LOVE WITH COASTERS!! We were using them in our bedroom ALL the time--and they didn't match our room!

So I had to make ones that matched!

AND I was experimenting using all kinds of different edge finishes with my NEW SERGER and decided I may as well be sewing something useful while I experimented!

SO HERE are the ones that match my bedroom:

(Don't you hate it when you can't get blogger to turn the picture the right way?)


AND yes, I love them and use them EVERYDAY!!

If you have not tried using coasters before--you really ought to!

Friday, April 23, 2010

Spray Painted Chandelier

Have I mentioned recently that I LOVE SPRAY PAINT?
Well, I DO!!
So since most everything in my house has been "Redone" with spray paint--I decided to try my luck with redoing my light fixture above my kitchen table.
Here it is BEFORE the magic and wonders of spray paint:
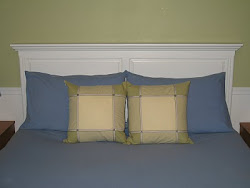
Not horrible but not in keeping with all the new black decor in my kitchen. So out it goes into my yard for a fresh coat of GORGEOUS!
(Gorgeous=Oil Rubbed Bronze Spray Paint)


And after:


GORGEOUS!!!

And it finally all matches!! Yay!!

Monday, April 19, 2010

Gold Be Gone

Hold on to your hats!
I am about to show you the MOST BEAUTIFUL sight I have EVER SEEN! Are you ready? Here it is:


The reason this is SO beautiful? Is because these gold/brass ugly door knobs are no longer on my doors!!! I cannot tell you how happy this picture makes me! Oh what bliss!


So--the story goes that besides being REPULSINGLY UGLY--these knobs were no longer functioning either. We pretty much had to break into our own house every time we locked the door--even though we had a key! It was pretty bad.


SO I was able to find some good deals on some pretty brushed silvery looking used door knobs at our local RE-use it store. Then I was lucky enough to find EXACT matches for the rest of the needed knobs at Home Depot! YAY!! So for a VERY reasonable price I was able to get all new knobs for all of our doors! Yippee!!


BUT now I had a problem.


I now had beautiful silvery knobs and BRIGHT BRASSY GOLD HINGES!!! So I looked at replacing them. Did you know those things are super expensive?! They are from $2.50-$5.00 a piece!! And each door needs three!!


SO--despite a lot of peoples misgivings--I turned to my new found best friend: Spray Paint.


I found a color that was a good match:

I tested it on an face plate I wasn't using--and was SUPER happy with the results. So I then went around to each door and took off only one hinge at a time. This way I didn't have to take off the whole door--I just did three rounds of spraying to finish the whole project.


Here are some of the awesome before and after pictures:

Yucky brass hinges awaiting their new look.


After a few coats of paint. Don't they look amazing?


Then--I had the problem of the screws--they were brass too. So I went and bought some new silver screws so I wouldn't have to paint the old ones. Only to not have them work out. SO I came up with this little box to hold all the screws so I could paint just the tops. It worked PERFECTLY and I saved the $8.25 on the new screws.


Here is a great one of a side by side. The old ones were so bad! They had paint (from previous owners not so careful paint jobs) and other scratches and gunk all over them!

But now I think they look great!


And they match the new knobs so well! I don't think anyone will ever know that they aren't the real thing. Oh, how I love you spray paint!


Besides the new knobs, this amazing makeover cost me just over $5
(the cost of one can of spray paint).


***Funny Side Note***
After completing this project and writing up this post--I stumbled across another AWESOME BLOG called Infarrantly Creative where this gal had already done this exact same project! AND SHE EVEN PAINTED HER DOOR KNOBS!!!

HERE is the link to her post--where she explains all of the steps she took and how it all turned out! She did a lot more prep/finish work (sanding/priming/and top coat) because she was doing the knobs as well. For my purposes (since I was only doing the hinges--because I NEEDED to replace my knobs--and hinges really don't get that much wear and tear) I only cleaned the hinges really well and painted them with a good quality paint.

What I thought was funny was how closely we did our projects--without even knowing it! She even made a little contraption to hold all her screws while she painted them--just like I did!

Thursday, April 15, 2010

Ode to Spray Paint

Oh, Spray Paint! How do I love thee? Let me count the ways!
I have just recently (over the last month) discovered the joy and bliss of spray paint. I had no idea what I was missing! My life is so much fuller, so much richer and more colorful now that I have it in my life!
Though some may say I am taking it a little too far. I wander around my house looking for things (Both inside AND outside) to paint. Exhibit A:
Yucky Brass House Numbers turned FABULOUS with some Outdoor Black Spray Paint!!
Exhibit B: Ho-Hum Paper towel holder purchased a million years ago at a garage sale for $0.50.
Now tell me this doesn't look better?
Now when I go to thrift stores I am looking for beautiful things that are asking for a make over.
Exhibit C & D (The item on the left and in the middle--all of these items I bought for $0.25 at my friend's thrift store):

The bowl on the left was a little too brown and a little too shiny on the inside--but I loved the look of it and the price! So I took care of it with some Oil Rubbed Bronze Spray Paint.

And Viola--An awesome new fruit bowl!


Remember my little dish holding my thrifty Jute Balls? It was the gold thing in the picture above! Doesn't it look like a million bucks with a coat of OIL RUBBED BRONZE paint?


And this little vase I didn't actually paint--I just put it in here cause it was such a fabulous vase for 25 cents!! And filled with some fun grass--it was the perfect thing for that space!

Stay tuned for even MORE fun SPRAY PAINTING PROJECTS!

MY FAVORITES ARE STILL YET TO COME!

Thursday, April 8, 2010

When Good Curtains Go Bad

In my crazy de-brassing and spray painting frenzy--I decided I NEEDED to spray paint the curtain rods in my kitchen. They NEEDED to be black.
This is what they looked like before the re-do:


Well--when I took them down, I realized how dusty they were and decided to wash them. WELL I was not particularly careful when washing them and the lovely red color bled all over all the other colors making it all look sort of pinkish.

Well--I figured I could still live with it...so I ironed them all up and put them back on the rods--only to find out that they had SHRUNK too. They shrunk around 4-5 inches!!!! SO now with the color problem AND the size problem I HAD to get new curtains.

After MANY a shopping trip to select fabric, this is what I settled on. It actually came from Walmart (if you can believe it--pretty cute for Walmart).


So I sewed some new curtains and left a wide 4 inch hem at the bottom (I like a thick hem at the bottom--it makes them hang nicely). Then I added some grosgrain ribbon right on top of the hem line.


I sewed the top with a 3 inch header and then sewed button holes every 4 inches for my NEWLY PAINTED rod to go thru.


Whenever I sew new curtains I always want to train them to fold and hang where I want them to--So I use a little clip to hold them in place for a few days. This kind of creases the bottoms so they naturally fold there--without having to actually press creases into them.


And I must admit--I LOVE how the curtains turned out!!


I am SO glad that I had such a huge laundry disaster with my old ones!

Headboard for $1

Here is yet another steal of a deal that I picked up at my friends $1 thrift store. (Yes you heard my right--I got this beauty for 1 dollar!!!!)
I LOVE THAT STORE!! I am a little bit addicted to it!!!
ANYWAYS, I found what I thought was a beautiful, yet very scratched up headboard and thought it had potential so I bought it. When I got it home my hubby informed me that it was actually a FOOT BOARD not a HEAD BOARD. But being the clever little guy that he is--said he would do some magic and make it into a headboard.
So--this is the bare bones of what he came up with--just using stuff we already had (OK--so I fibbed just a little--we had some plywood at home but it had been outside so it was a little gross looking--so instead of using our plywood he did buy some new stuff--but it wouldn't have cost us anymore if we would have used the stuff on hand).
Since we were planning on painting it white to match our room, he wanted to keep a nice white edge all the way down to the floor on the sides--so if any of it was peaking out behind the bed you wouldn't see the plywood. So he used some pieces of white MDF that we had on hand and screwed them and the headboard all into the plywood at the back.


My hubby sanded and primed it--and I painted it and POOF--we have a NEW HEADBOARD!

This is the very first time in my whole life that I have had a headboard of any variety.
I feel SO grown up in a big girls bed!!!

And THANK YOU my hubby--for making it all possible!
(I love you and your mad carpenter skills!)
Dollar Deals Make Me HAPPY!

I am linking up to THESE parties.

Related Posts with Thumbnails